In the previous post, we saw how to get started with Typer including commands, arguments and options. We also saw how to define styles using Rich to format text. This post will show how to get started with SQLModel to store and retrieve data in a SQLite database.
Defining the Data Model Class
Before using SQLModel it needs to be installed. As it is distributed as a Python package, you can use pip to install it.
$ pip install sqlmodelSQLModel leverages SQLAlchemy. If you have used SQLAlchemy you’ll see that the SQLModel API mirrors the SQLAlchemy API in many cases. The data model class will be associated with a table in the SQLite database. It will subclass the SQLModel base class which needs to be imported.
from sqlmodel import SQLModelNow create a new class, Event, that subclasses SQLModel. Also, tell SQLModel this will be associated with a database table by setting the table keyword argument to True.
class Event(SQLModel, table=True):The columns of the database table will be associated with attributes of the model class. These can be defined similar to how you would define attributes of a dataclass. For example, the title of the event is a simple string.
class Event(SQLModel, table=True):
  title: str
There is also a boolean marking this event as private if set to True. However, we can also set a default value and make events publicly visible by default.
class Event(SQLModel, table=True):
  title: str
  private: bool = False
Sometimes you need more than just a simple type. The Field type configures a column/attribute association with extra metadata. The Field type needs to be imported from the sqlmodel module:
from sqlmodel import Field, SQLModelEvery table needs a primary key that is an integer. But we also need to tell SQLModel that this attribute is the primary key of the model class. Also, set the default keyword argument to None so that we can get away with waiting for SQLModel to add the value later.
class Event(SQLModel, table=True):
  id: int = Field(primary_key=True, default=None)
  title: str
  private: bool = False
The model class also needs a timestamp. This will be a Python date from the datetime module. But we can also use the default_factory keyword argument to use the today function of the datetime.date type to use the current date as the default value.
import datetime

class Event(SQLModel, table=True):
  id: int = Field(primary_key=True, default=None)
  title: str
  timestamp: datetime.date = Field(default_factory=datetime.date.today)
With the data model class, we can now use SQLModel to generate the database. Import the create_engine function from the sqlmodel module:
from sqlmodel import Field, SQLModel, create_engineAn engine is a connection to a database, in this case a SQLite database file. The create_engine function accepts a path to that database file.
engine = create_engine("sqlite:///events.db")And you can create the database by calling the create_all function on the metadata of SQLModel. Pass create_all the engine so it will know which database to create.
SQLModel.metadata.create_all(engine)Getting User Input
The next step is to create a new command that will prompt the user for details about an event and use that input to add a new Event to the database. While Typer has an API to prompt the user for input, since we are using Rich, I am going to use the Prompt type in the rich.prompt module.
from rich.prompt import PromptCall the ask function on the Prompt type to get input from the user returned as a string. The Event model class expects more diverse data types so we will need to parse the timestamp string and check if a private event has been confirmed too.
@app.command()
def add_event():
  title = Prompt.ask("Title of the event")
  timestamp = datetime.datetime.strptime(
    Prompt.ask("Date of event (YYYY-MM-DD)"),
    "%Y-%m-%d"
  ).date()
  private = Prompt.ask("Private event (y/n)").lower() == "y"
To interact with the database, you’ll use a Session. Import it from the sqlmodel module.
from sqlmodel import Field, Session, SQLModel, create_engineUse the engine to create a Session. This is often done in a with block to ensure that the Session is automatically closed.
with Session(engine) as session:Now create and populate an instance of the Event model class, add it to the Session and commit the changes to the SQLite database.
with Session(engine) as session:
  event = Event(title=title, timestamp=timestamp, private=private)
  session.add(event)
  session.commit()
Now we need to display a confirmation message to the user. For now, we’ll assume the user won’t make a mistake. A bold green style would work for the message and it’s likely we will want to use this more than once. Add a new success style to the ApplicationStyles dataclass.
@dataclass
class ApplicationStyles:
  error: Style = Style(color="red", bold=True)
  succcess: Style = Style(color="green", bold=True)

def add_event():
  # ...
  console.print(
    f"Added event with title {event.title}",
    style=app_styles.success,
  )
Now you can try out the new command! Since the command function is add_event, the command name will be almost the same, add-event the only difference is the the underscore in the function name is a dash in the command.
$ python main.py add-event
Title of the event: New Event
Date of event (YYYY-MM-DD): 2025-02-02
Private event (y/n): n
And the result:
Added event with title New Event
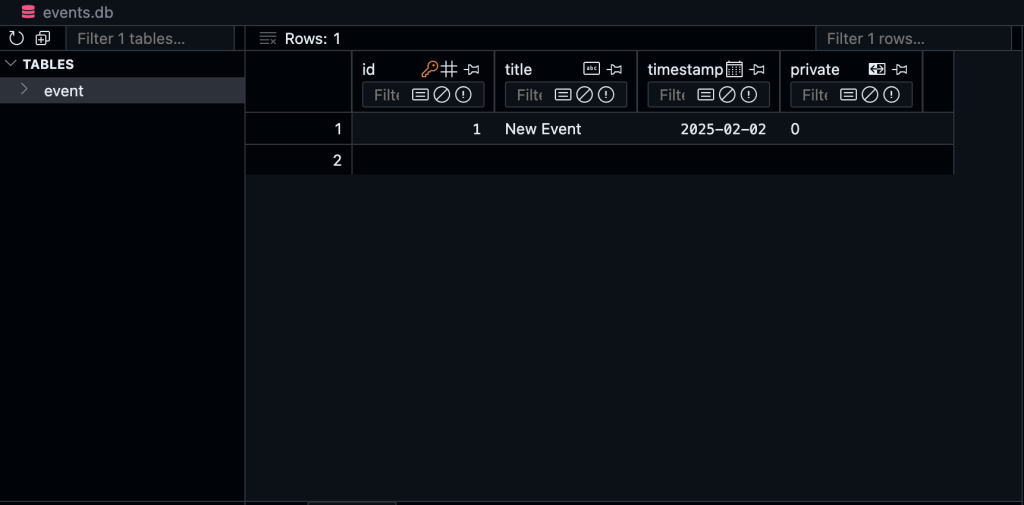
If you are using Visual Studio Code, you can install the SQLite Viewer extension by Florian Klampfer to peek inside the database and ensure the event was added.

In the Explorer pane, right click on the database and Open With. In the Command Pallette, select SQLite Viewer.

Displaying Data from the Database
Let’s look at how to retrieve the Event we just added to the database. Create a new command with a function called show_events():
@app.command()
def show_events():
You’ll need a Session object to interact with the database:
with Session(engine) as session:Now you’re going to construct a query using functions from the SQLModel API. This API often mimics the SQLAlchemy API. In this case you’ll need the select function from the sqlmodel package. Construct a query to select all Events. Then call the exec method on the session to execute the query. And to retrieve all of the results, call the all() method.
from sqlmodel import select

# ...

    events = session.exec(select(Event)).all()
You can iterate over the events like a list.
    for event in events:
        console.print("{event.title}")
Here is the result of invoking the show-events command:
$ python main.py show-events
Event One
Event Two
Event Three
This works, but we can make it look better with the help of a Rich layout. Import the Table from the rich.table module:
from rich.table import TableA table can have a title and one or more columns. Let’s include columns for title, days remaining, and if the event is private.
table = Table(title="Events")
table.add_column("Title")
table.add_column("Days Remaining")
table.add_column("Private")
Iterate over the events and calculate the days remaining. Then add a row for each event.
for event in events:
  days_remaining = (event.timestamp - datetime.date.today()).days
  table.add_row(event.title, f"{days_remaining} remaining", "Yes" if event.private else "No")
And use the console to print the table:
console.print(table)Invoke the show-events command and the results will look something like this:
$ python main.py show-events
                  Events
┏━━━━━━━━━━━━━┳━━━━━━━━━━━━━━━━┳━━━━━━━━━┓
┃ Title       ┃ Days Remaining ┃ Private ┃
┡━━━━━━━━━━━━━╇━━━━━━━━━━━━━━━━╇━━━━━━━━━┩
│ Event One   │ 24 remaining   │ No      │
│ Event Two   │ 53 remaining   │ Yes     │
│ Event Three │ 85 remaining   │ No      │
└─────────────┴────────────────┴─────────┘
In a future post we will see how to use styles to emphasize datapoints about the data.
Summary
In this post you learned how to implement a data model using SQLModel. You also learned how to use the SQLModel API to connect to a database and store and retrive data from the database. You also learned how to use Rich tables to display data in tabular layout.
