
We try hard to write code that is free of bugs. But it’s impossible to avoid all bugs and errors in software. So we need to check our work and validate the design t and implementation of our software. For Python applications, we can use pytest to write tests that ensure our code is working as expected. This post will show how to write a simple class, including tests with pytest, and the features of Visual Studio Code intended to make running and managing tests easier.
Configuring the Development Environment
The only thing you’ll need to run and manage Python tests in Visual Studio Code is the Python extension from Microsoft. The Python extension includes a test runner UI that lets you discover tests and run specific tests or groups of tests. It works with both the unittest model from the Python Standard Library as well as the pytest package I’ll use in this post. And I’ve also installed Ruff and configured it as the default formatter. I’ve done this in other posts so I won’t repeat the steps to do that here. Also keep in mind that everyone described in this post for Visual Studio Code will work almost identically in a GitHub Codespace. In fact, I’ll be using a GitHub Codespace for the screenshots in this post.
The Class to Test
Here is the file structure of the demo project:
/src
  /app
    __init__.py
    bank_account.py
  /test
    __init__.py
    test_bank_account.py
The __init__.py files should be blank. We’ll see the code for /src/app/bank_account.py next. And then later the tests will go in /src/test/test_bank_account.py.
The class that we will be writing tests against is a simple bank account. The following code should be in /src/app/bank_account.py
import datetime
from dataclasses import dataclass
from enum import Enum


class BankAccountTransactionType(Enum):
    DEPOSIT = 0
    WITHDRAWAL = 1


@dataclass
class BankAccountTransaction:
    transaction_type: BankAccountTransactionType
    amount: float
    date: datetime.date


class BankAccount:
    def __init__(self, owner: str, balance: float = 0.0):
        if balance < 0:
            raise ValueError("Initial balance cannot be negative")
        self.balance = balance
        self.owner = owner
        self.transactions = []

    def withdraw(self, amount: float) -> float:
        if amount < 0:
            raise ValueError("Cannot withdraw negative amount")

        if amount > self.balance:
            raise ValueError("Cannot withdraw more than balance")

        self.balance -= amount
        self.transactions.append(
            BankAccountTransaction(
                transaction_type=BankAccountTransactionType.WITHDRAWAL,
                amount=amount,
                date=datetime.date.today(),
            )
        )
        return self.balance

    def deposit(self, amount: float) -> float:
        if amount < 0:
            raise ValueError("Cannot deposit negative amount")
        self.balance += amount
        self.transactions.append(
            BankAccountTransaction(
                transaction_type=BankAccountTransactionType.DEPOSIT,
                amount=amount,
                date=datetime.date.today(),
            )
        )
        return self.balance

    def recent_transactions(self, n: int = 3) -> list[BankAccountTransaction]:
        if n < len(self.transactions):
            n = len(self.transactions)
        recent = self.transactions[-n:]
        recent.reverse()
        return recent

    def most_recent_transaction(self) -> BankAccountTransaction:
        return self.transactions[-1]

    def check_balance(self) -> float:
        return self.balance

    def __str__(self) -> str:
        return f"<BankAccount owner-{self.owner} balance-{self.balance}>"
There isn’t a whole lot to this class. The BankAccount class holds an owner, balance, and list of transactions. The BankAccountTransaction class has a transaction type, the amount of the transaction and the date of the transaction. Then you can deposit and withdraw funds and check the balance and most recent transactions. Notice you cannot deposit and withdraw negative amounts. And you cannot withdraw more than the account balance. Here is a sample usage:
bank_account = BankAccount("New Owner")
bank_account.deposit(1000.00)
bank_account.withdraw(200.00)
print(f"Current balance: ${bank_account.check_balance()}")
print("Recent transactions:")
for t in bank_account.recent_transactions():
    print(
        f"{t.date.strftime('%Y/%m/%d')} | {t.transaction_type.name} | ${t.amount}"
    )
Writing the First Test
Again, for this post, we will be using the Python package pytest. Unlike unittest, another Python test frameworks, pytest is not distributed with the Python Standard Library and thus must be installed with pip:
$ pip install pytestInside of /src/test/test_bank_account.py import the pytest module and the BankAccount class.
import pytest

from app.bank_account import BankAccount
Now write a function that creates a new BankAccount and checks to ensure that the starting balance is zero:
def test_bank_account_default_balance_is_zero():
  bank_account = BankAccount("Account Owner")
  assert bank_account.check_balance() == 0
The assert statement verifies that a condition is True. If the check_balance function returns 0 the assertion will pass. Otherwise it will fail. To see if the test passes, run pytest from the /src folder.
$ cd src
$ pytest
============================= test session starts =============================
platform linux -- Python 3.12.1, pytest-8.3.4, pluggy-1.5.0
rootdir: /workspaces/codespaces-blank/src
plugins: anyio-4.7.0
collected 1 item

tests/test_bank_account.py .                                                                                  [100%]

============================== 1 passed in 0.01s ==============================
We need to talk a second about test discovery. Notice that we did not tell pytest where to look for the test_bank_account_default_balance_is_zero function or even that the function is a test at all. By convention, pytest will look for tests in Python files that begin with test_ or end with _test. Thus pytest looked in test_bank_account.py. It also would have looked in bank_account_test.py as the _test is also a valid test file. Inside of the test file, by convention, pytest will run functions that begin with test_ and take no parameters. And as you can see on the last line of the output, 1 test was discovered and it passed.
Let’s write a failing test. Add the following test function to test_bank_account.py.
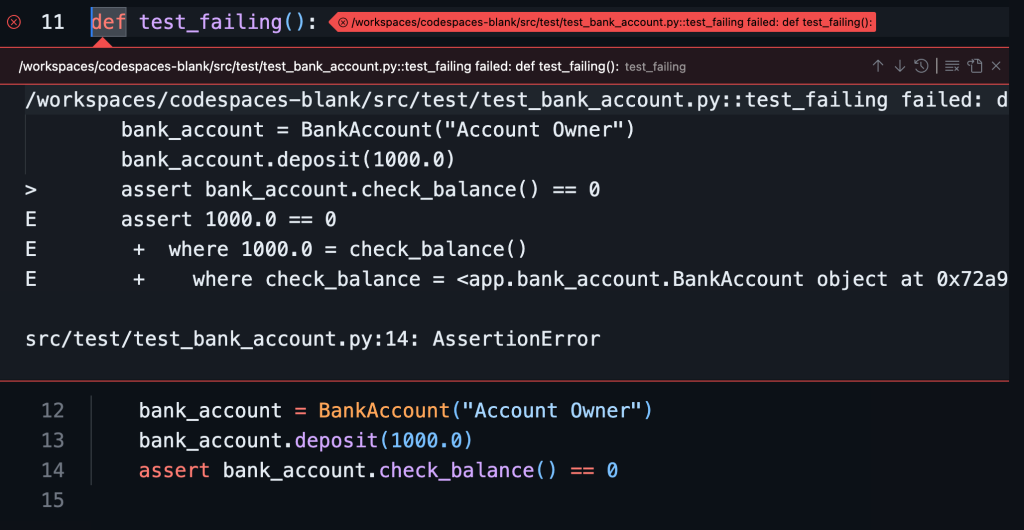
def test_failing():
  bank_account = BankAccount("Account Owner")
  bank_account.deposit(1000.0)
  assert bank_account.check_balance() == 0
Run pytest again.
$ pytestI won’t include all of the output but the first indication that there is a failing test is this line
src/tests/test_bank_account.py .FThe F means a test has failed. Notice that the dot is for the passing test still in the file. There is also more details about the failing test. This shows us that the test failed on line 13. And then the short summary.
FAILED tests/test_bank_account.py::test_failing - assert 1000.0 == 0As you can see, the test_failing function failed at the assert because the expected value was 0 but the actual value is 1000 and thus the condition evaluates to False. To make the test pass, merely charge the equals operator to the not equals operator so the condition will evaluate to True and run pytest again. But let’s do that with the Visual Studio Code Python test runner.
Running Python Tests in Visual Studio Code
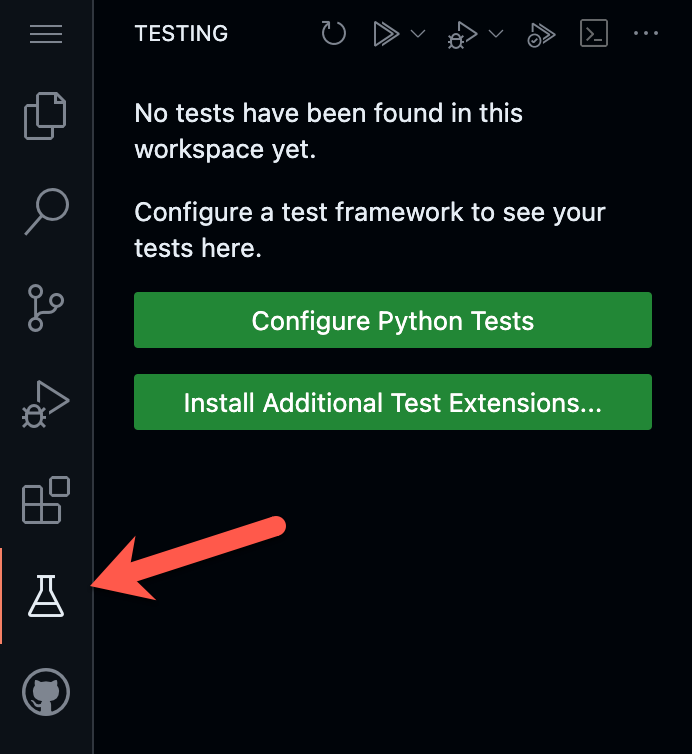
When you install the Python extension, you also get tools for managing and running tests. It works with both pytest and unittest. Here you will see how to use it with the pytest module. Click on the Testing icon in the sidebar.
Click on the Configure Python Tests button. The Command Pallete will ask you to select which testing framework you are using. Select pytest from the list.
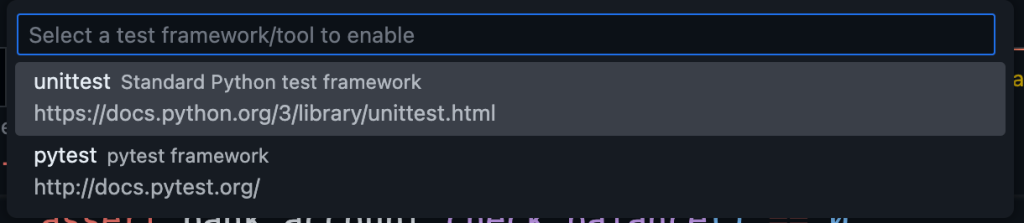
The next prompt asks you to select the directory containing the tests. Select src.

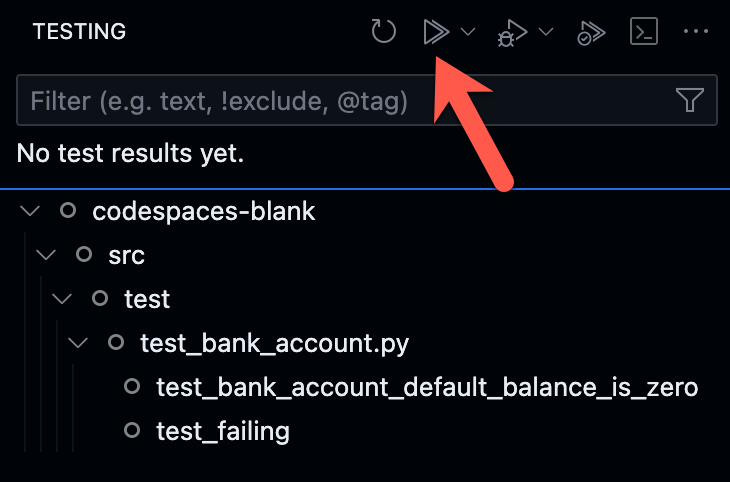
Look in the Testing panel in the sidebar. Visual Studio Code has detected the tests using the discovery rules for pytest. To see them, expand codespaces-blank, src, test, and then test_bank_account.py. You will see the two test functions. Click the Run Tests button at the top of the panel to run the tests.
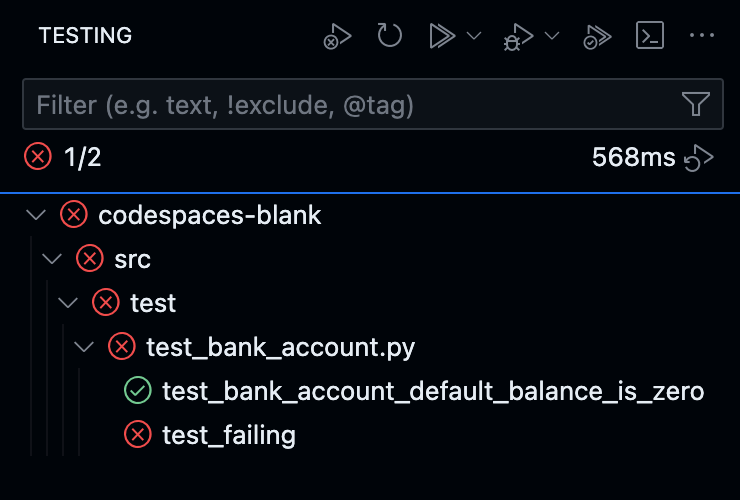
The tests will run and you’ll be able to see the results in the Testing panel. Notice that the test_bank_account_default_balance_is_zero test passed while the test_failing test failed.
To see details about the failing test, click on it. The function for the test will be highlighted and the pytest output will be displayed.
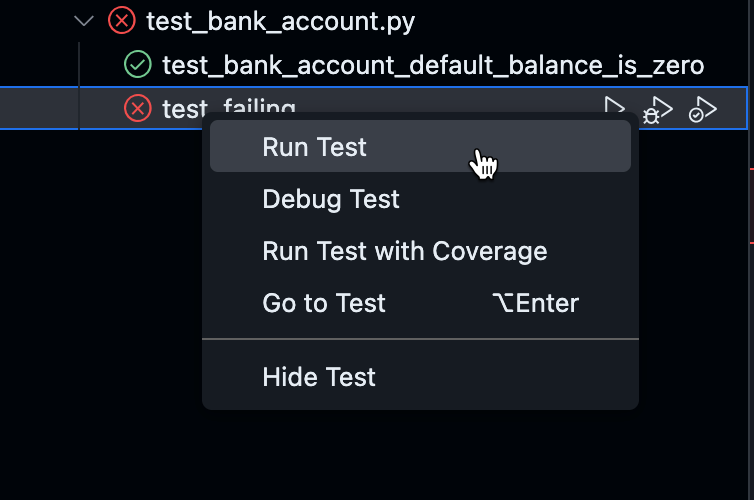
To fix the test, change the 0 in line 14 to 1000.0. Now you can rerun the test. Instead of running all of the tests, including the passing tests, again right click on the failing test and select Run Test.
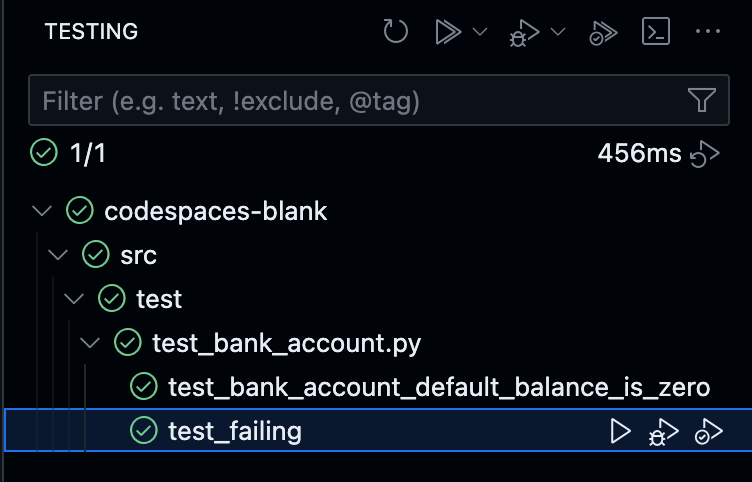
And now all the tests are passing and green!
There is much more you can do with pytest and the Visual Studio Code test runner. Stay tuned for future posts to learn more.
Summary
In this post you learned how to get started testing Python applications using Visual Studio Code. You used the pytest framework but you can also use unittest from the Python Standard Library. You saw how to organize the code for testing. You wrote a few simple tests and using the command line pytest utility to run them. Then you saw how to set up Visual Studio Code to discover tests. You ran them using the test runner. The failing test was fixed and then run by itself. And you made all of the tests pass and saw this in the Visual Studio Code Testing panel displaying green checks.