In the previous post we saw how to implement a complete REST API using a SQL database with FastAPI. The only step left is to make it available to the world. This post will cover the steps to do that using the services offered by Microsoft Azure. First, we’ll modify the application to work with a database server, PostgreSQL for this demo. Then we’ll see how to containerize the application and run it on a Docker host. And we’ll see Visual Studio Code extensions for managing both. Then we’ll use Azure Database for PostgreSQL Flexible servers and Azure Container Apps to deploy the application to the public web.
Using PostgreSQL
So far, the application has been using SQLite for a database. And this is great for prototyping. Getting a SQLite database running involved nothing more than creating the database file and passing the path to SQLAlchemy. However, SQLite is not recommended for web applications that could have multiple simultaneous users. To handle multiple connections to a database, Python applications will often use PostgreSQL.
Unlike SQLite, PostgreSQL hosts databases on a server. So you first have to install that server. Then you have to configure access to the server, create the database, and setup security. After that, you get the connection string for the server and pass that to SQLAlchemy. Going forward, the process for using the database is the same as SQLAlchemy abstracts the implementation. And using Azure Database for PostgreSQL Flexible servers reduces the setup time that is needed.
The Flexible server is ideal for development because you can get a PostgreSQL server in the cloud for less than $20 a month. (You can also get a 12 month free tier of Azure services including a PostgreSQL database.) Flexible servers offer a burstable compute tier so you can select a lower compute limit and if your needs temporarily exceed that Azure will accommodate the increased consumption. In addition you can turn Flexible servers on and off to save even more.
Note: You can also use Azure Cosmos DB to create a PostgreSQL database. However, the free tiers of Azure services currently do not offer PostgreSQL on Cosmos DB. I am trying to focus on free services in this post and will use the Azure PostgreSQL Flexible database servers.
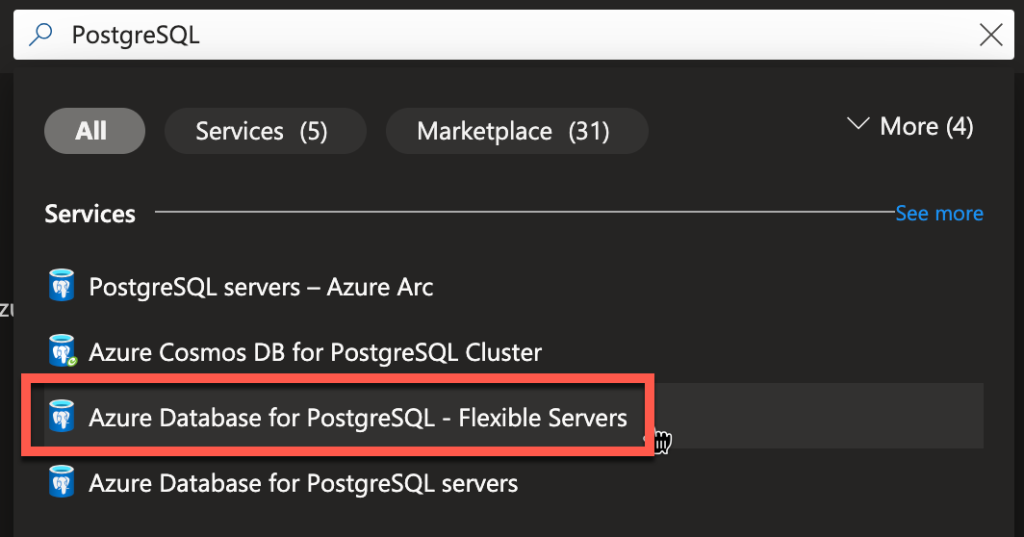
To create a PostgreSQL server on Azure go to the Azure Portal at https://portal.azure.com. In the search box at the top, search for PostgreSQL and select Azure Database for PostgreSQL – Flexible Servers.
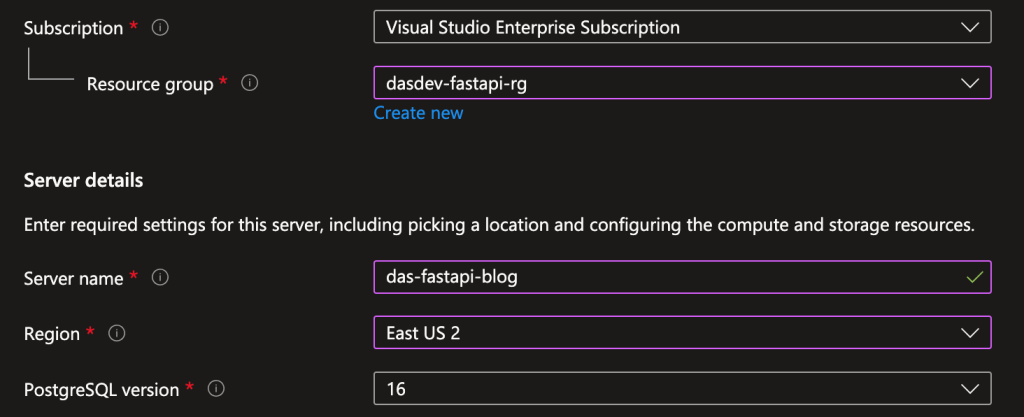
On the next page, click the Create button on the toolbar near the top of the page. On the Basics tab of the next page, you configure the resource. Select a subscription and resource group. And select a PostgreSQL version.
Now we’re going to configure the server with the most basic compute, memory and storage settings to reduce cost. For Workload type select Development. (1) Then click the Configure server link. (2)

In the next page make the following selections:
- For Compute tier select Burstable (1)
- For Compute size select Standard_B1ms (2)
- For Storage size select 32 GiB (3)
- For Performance Tier select P4 (4)
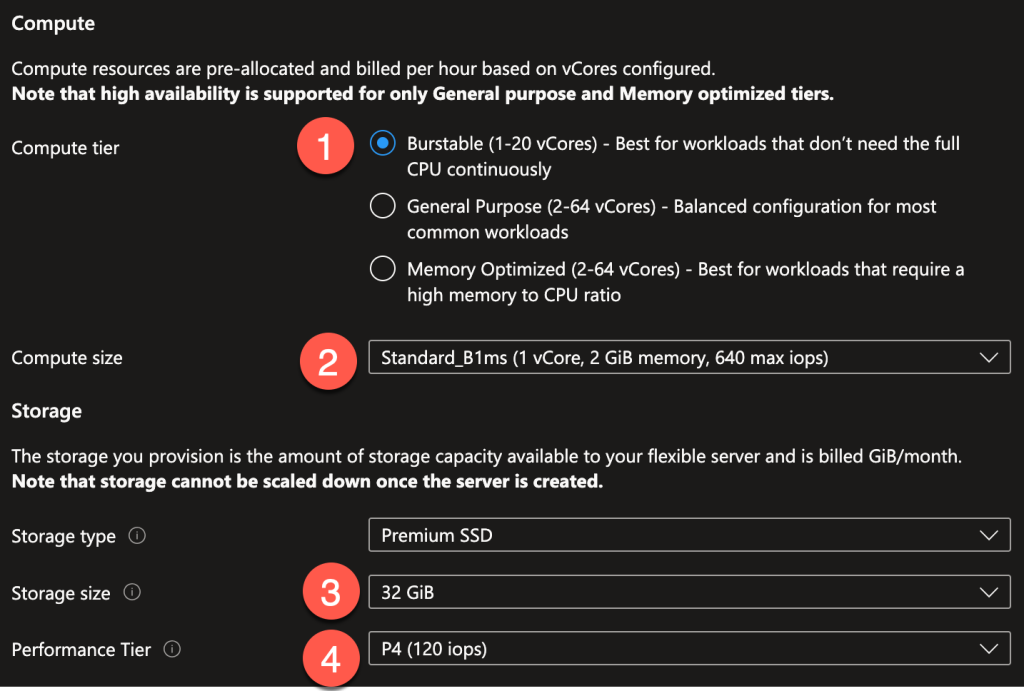
This will result in a server that doesn’t cost much (less than $20/month in my region) but doesn’t have much capacity. And for this demo that’s fine. To continue, leave the other settings at their default values and click the blue Save button.
Back in the Basics tab, scroll down to the bottom of the page. For Authentication select PostgreSQL authentication only. (1) Then provide a username for the admin user, and a password. (2)

Switch to the Networking tab and scroll down to Firewall rules. Check the box to allow access to this server from other Azure services. (1). This will come in handy later. Then, so we can access the server and view the data in Visual Studio Code, add a firewall rule. Azure will detect your IP address and provide a link to add it automatically. (2). Or you can click the link to allow all IP addresses although this is recommended only for temporary use for testing and development. (3)

Click the blue Review + create button to validate the configuration. In the last page click the blue Create button to provision the server.
Connecting to the Database
To connect locally, we’re going to use an extension in Visual Studio Code. You could use other tools such as pgAdmin or even psql at the command line.
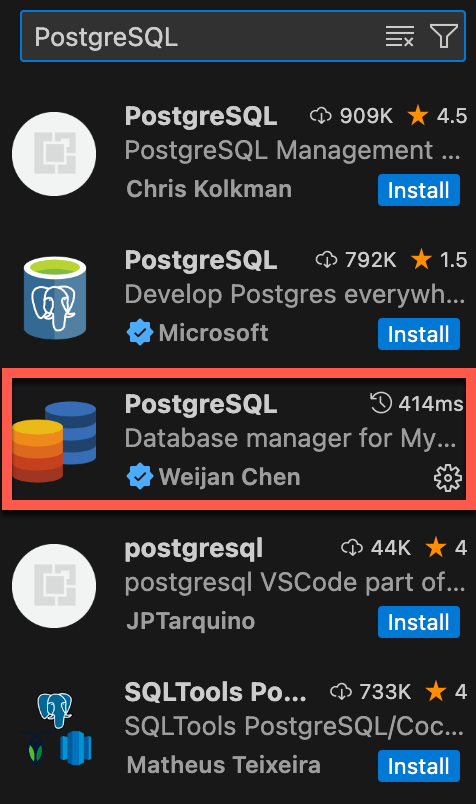
In Visual Studio Code open the Extensions panel and search for PostgreSQL. Then find the extension by Weijan Chen and install it.
Click the Databases icon in the sidebar to open a new tab where you can configure a new connection.

In the Database panel, click on the plus icon at the top to add a new database connection. (The free version of the extension will let you save up to three SQL connections and three NoSQL connections.)

In the Connect tab, select the PostgreSQL tab. (1) To find the connection details for your Flexible server on Azure, go the resource page in the Azure Portal and then in the side expand Settings and Connect.

In the Connection details box to the right, use the value of the environment variables to configure the connection in the extension.
- Use the value for PGHOST in the Host box in the extension
- Use the value for PGUSER in the Username box in the extension
Fill in the Password box in the extension. Make sure the the switch for SSL is On. Click the blue + Connect.
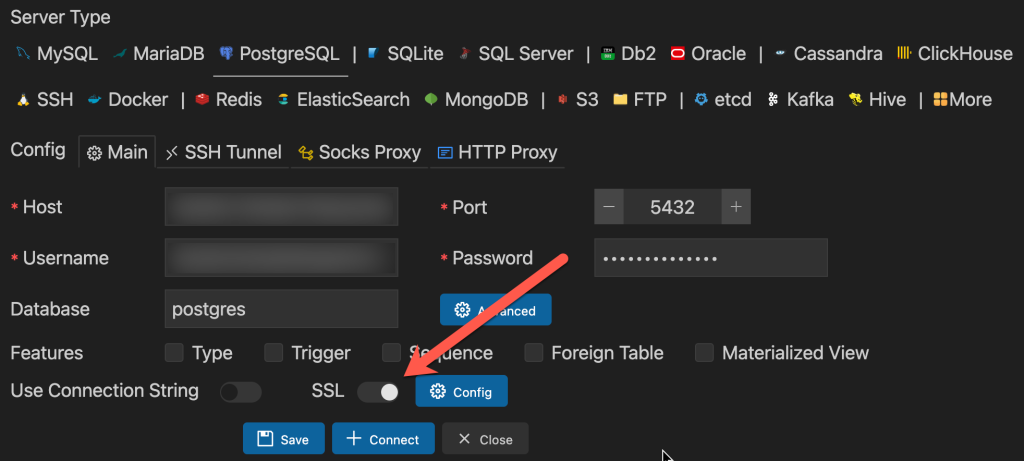
In the Database panel, expand the new entry for the server.

You need to manually create the database for the FastAPI application. Hover over the server name, and click the plus icon to scaffold a new SQL script.

In the SQL script, finish the CREATE statement with the database name blog.
CREATE DATABASE blog;Click the Run button over the CREATE statement.

In the Database panel you’ll see the new database.

Connecting to FastAPI
To access the database using SQLAlchemy, first you have to install the Python package with PostgreSQL drivers. This is called psycopg2-binary.
$ python -m pip install psycopg2-binaryThen you’ll need the connection string for the database. The format for the connection string is:
postgresql://{username}:{password}@{server}:5432/blogUse the PGUSER and PGHOST environment variables from the Azure portal for the username and server in the connection string. Then replace the DATABASE_URL in app/db.py in the application. Normally you would not do this in production because it exposes the password in plain text but for the demo we’ll skip that.
DATABASE_URL = "postgresql://my_user:top_secret@my_server.postgres.database.azure.com:5432/blog"Also, in the call to the create_engine function, remove the connect_args keyword argument as it is specific to SQLite and will raise an error with PostgreSQL.
engine = create_engine(DATABASE_URL)Copy the connection string and paste it into the alembic.ini file for the sqlalchemy.url value.
Now you can run the alembic command to apply the most recent migration to the PostgreSQL database.
$ alembic upgrade headIn the Database panel, expand the blog database and the public schema and then Tables. You’ll see two new tables, alembic_version and todo_items.

Run the FastAPI and create some todo items. In the Database panel right click on the todo_items table and select SQL Template > SELECT.

Run the resulting SELECT statement and see that data is being stored in the Azure PostgreSQL database you created.
Building a Docker Container
Before deploying the application to a Docker container, install the Docker extension for Visual Studio Code. In the Extensions panel, at the top, search for docker. Install the extension from Microsoft.

(You’ll also need to have Docker Desktop installed.)
Next, add a requirements.txt file to the root project folder. When building the container, Docker will use the requirements.txt file to install the packages the application depends on.
fastapi
uvicorn
sqlalchemy
psycopg2-binary
Next, open the Command Palette in Visual Studio Code with the keyboard shortcut Ctrl-Shift-P (or Cmd-Shift-P on macOS). Search for docker add and select the command Docker: Add Docker Files to Workspace.
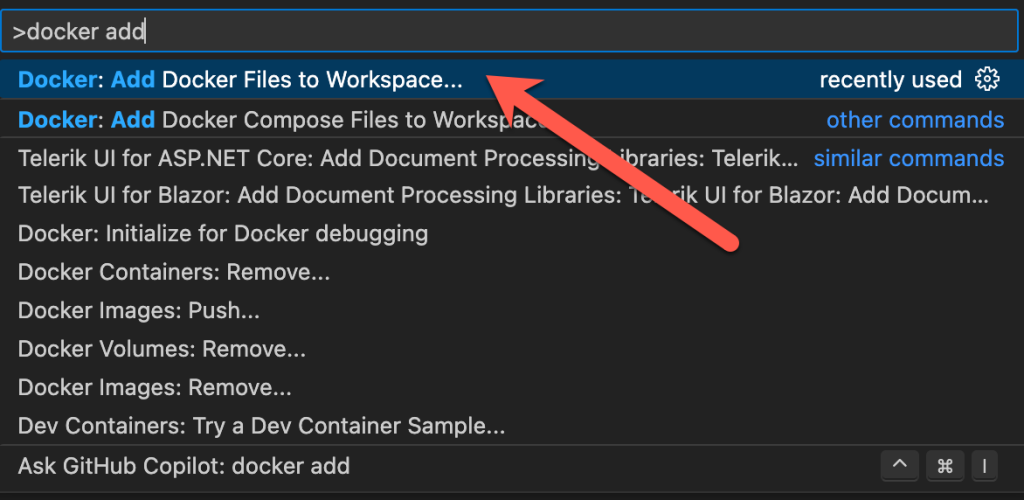
In the prompts that follow, select Python: FastAPI for the application type, and app/main.py for the entry point. Set 8000 for the port to listen on. And do not generate Docker Compose files.
This will place a .dockerignore and Dockerfile in the project root. Open the .dockerignore file. Any file in the project matching the paths in the .dockerignore file will not be added to the container. It’s like a .gitignore file. Notice that paths to ignore the virtual environment folder .venv and the .vscode configuration folder have been added by the Docker extension. In addition, add the alembic folder, the alembic.ini file, and the blog.db SQLite database.
**/alembic
alembic.ini
blog.db
Now open the Dockerfile. You can use this file as is, except for the last line. This will run the application using the WSGI server gunicorn. But we want to use the ASGI server uvicorn. Replace the last line with
CMD ["uvicorn", "app.main:app", "--host", "0.0.0.0", "--port", "8000"]The CMD command instructs the container to run uvicorn to start the application. The parameters and options are then separated by commas. So this command will start uvicorn with a FastAPI application in app.main:app. And it will listen on any IP on port 8000. Notice at the top of the Dockerfile the container exposes port 8000.
Now we need to build the container image. This is done at the command line with the docker build command. The -t is a tag that will identify the image. After that is the path to the Dockerfile. I’m running docker build in the folder with the Dockerfile so I’ll use a dot.
$ docker build -t dasdev_fastapi_blog .Docker will download the necessary parts to create the container. Then it will install the dependencies from the requirements.txt file. It will copy the files not matched in the .dockerignore file to the container image. It will create a user to run the application and then the command we added earlier.
Verify that the container image was built. Open the Docker panel (1) and expand the Images section. You should see the dasdev_fastapi_blog image. (2)

Now use docker run to create a container from the image and start it.
docker run --name dasdev_fastapi_blog_cntr -p 8000:8000 -d dasdev_fastapi_blogThe --name option assigns a friendly name to the container so we don’t have to refer to it by a randomly generated id. The -p option maps port 8000 exposed by the container to port 8000 on the host. The -d option tells Docker to run the container in the background instead of exiting when the run command exits. And dasdev_fastapi_blog is the image name to use.
In the Docker panel, in the Containers section, a new container named dasdev_fastapi_blog_cntr has been added. And the green run icon means it is running.

Since the port exposed by the container was mapped to port 8000 on the host, you can go to localhost:8000/docs in the browser and see the interactive documentation. And this is using the PostgreSQL Flexible server on Azure so you will be able to see the todo items added earlier. To stop the container, right click on it and select Stop from the pop up menu.
Push an Image to Azure Container Registry
The end goal is to run the container on Azure Container Apps (ACA). But first, ACA has to be able to get the image from which the container will be created. And repositories are which container images are stored. For example, if you want to create a new container for a PostgreSQL database, you call pull the image by running the command: docker pull postgres. This will download the postgres image from the default container repository, Docker Hub.
Azure also offers a service to store container images, Azure Container Registry (ACR). Let’s push the image we just create to ACR to make it available to ACA.
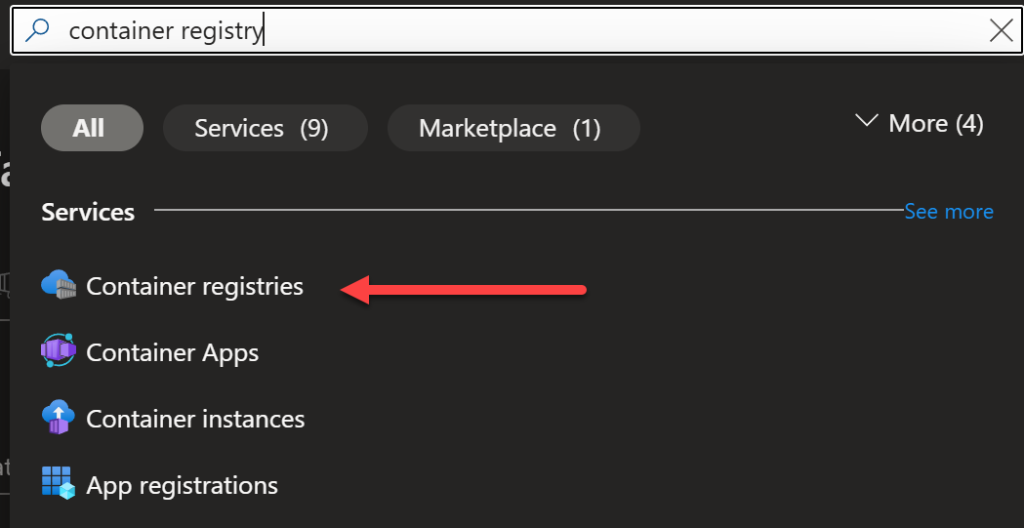
First, in the Azure Portal, and the top of the page, search for container registry and select Container registries.
Click the Create button on the next page. Now you can provision an ACR instance. Select a subscription (1) and resource group (2). Also provide a name for the registry (3) and select a location (4). Finally select a pricing plan (5). The Basic tier starts at $5.00 a month. (You can get 12 months of the Standard pricing tier with an Azure free tier account.)
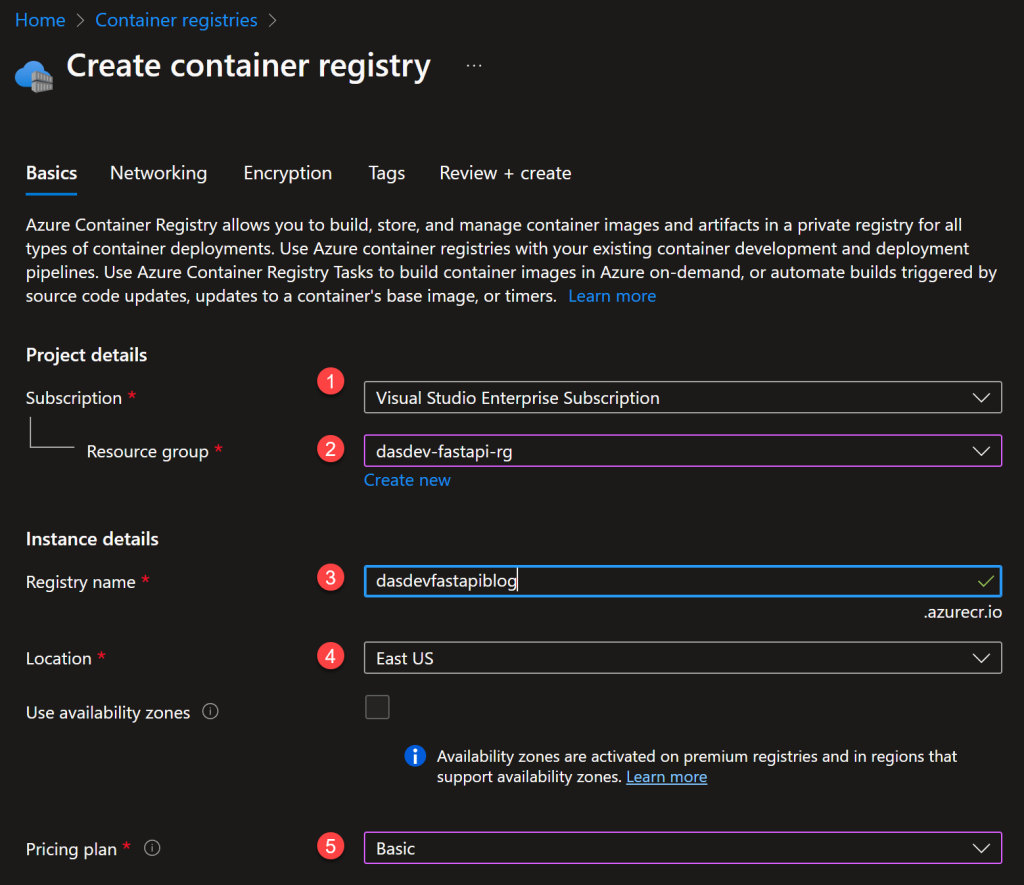
Click the blue Review + create button and then the Create button on the next page to provision the resource.
The next step requires the Azure Command Line Interface (CLI) to be installed. First, use the Azure CLI to log into the ACR instance:
$ az acr login --name dasdevfastapiblogNow you can push the container image to the registry. The image must be tagged with the name of the registry server. You can use the docker tag command for this:
$ docker tag dasdev_fastapi_blog dasdevfastapiblog.azurecr.io/dasdev_fastapi_blogIf you look in the Images section of the Docker panel in Visual Studio Code you’ll see the newly tagged image.

Now using the docker push, command push the tagged image to the ACR instance.
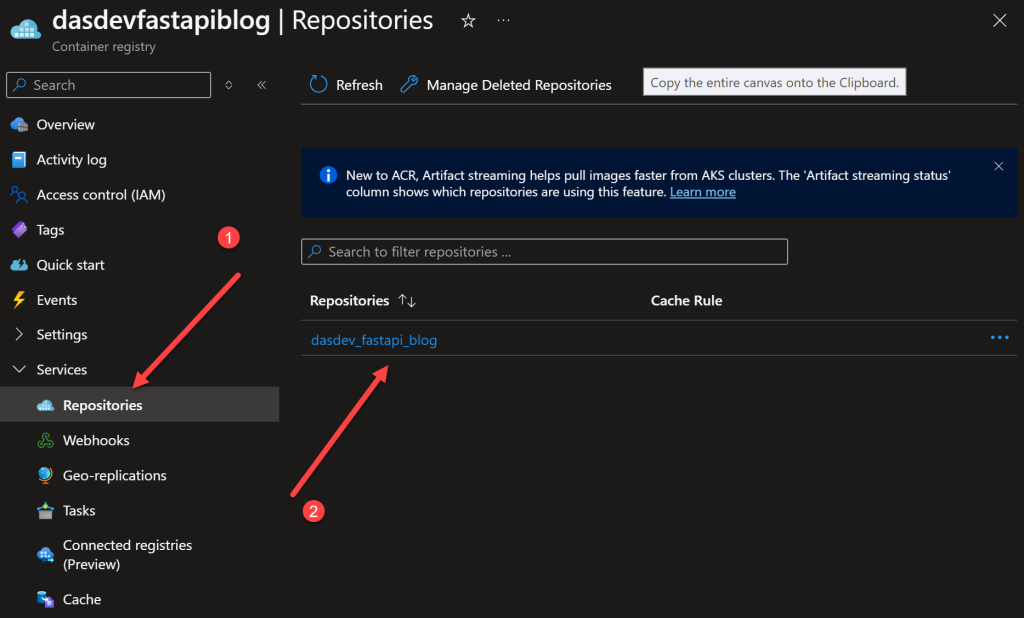
$ docker push dasdevfastapiblog.azurecr.io/dasdev_fastapi_blogAfter the command finishes, go to the page for the ACR resource in the Azure portal. Expand Services in the left sidebar and select Repositories. (1) You will see a repository with the same name as the container image. (2)
Deployment with Azure Container Apps
This is the moment we’ve been waiting for! We can finally deploy the a container to Azure Container Apps! (ACA)
First, you need to allow access to the ACR repository with the container image. The simplest way to accomplish this is enable admin credentials on the ACR instance. In a production setting with multiple container apps and multiple users, this might not be ideal. For this post I’m looking to be as straightforward as possible. Use the Azure CLI to update the ACR instance.
az acr update -n dasdevfastapiblog --admin-enabled trueYou will need to replace dasdevfastapiblog with the name of your ACR instance.
In the Azure Portal, at the top of the page, search for container apps and select Azure Container Apps.

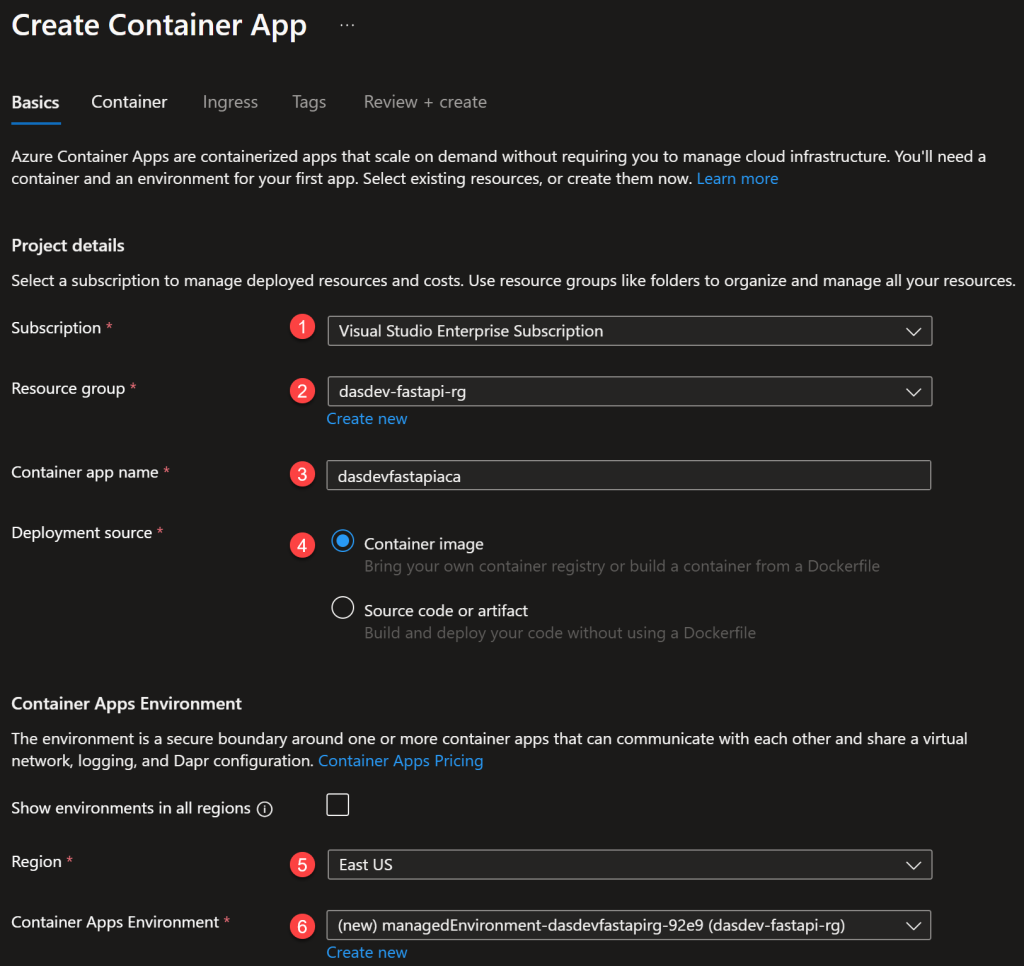
On the next page click on Create > Container App to configure and provision a new ACA instance. Select a subscription (1) and resource group (2) and give the ACA instance a name. (3) For Deployment source, select Container image. (4) Then select a region (5) and accept the default name of the Container Apps Environment. (6)
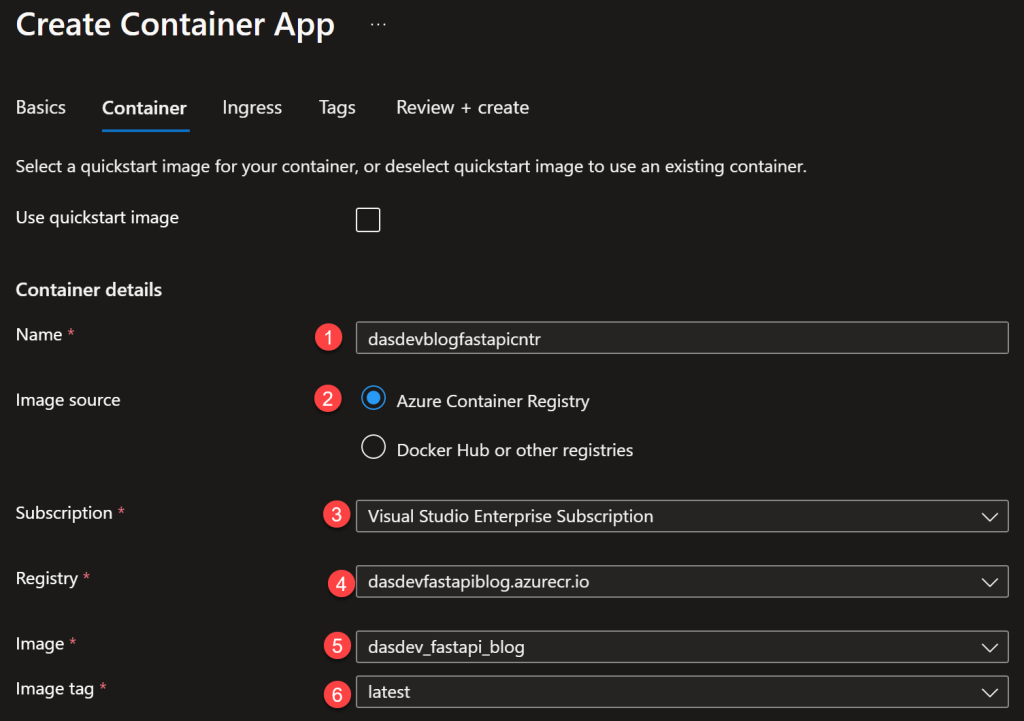
Click the Next: Container > button to configure the container. Give the container a name. (1) For Image source select Azure Container Registry. (2) Select a subscription. (3) For Registry select the ACR instance you created. (4) The names of the images and tags will load and select the container image you pushed. (5) (6) Leave the defaults for the rest of the values.
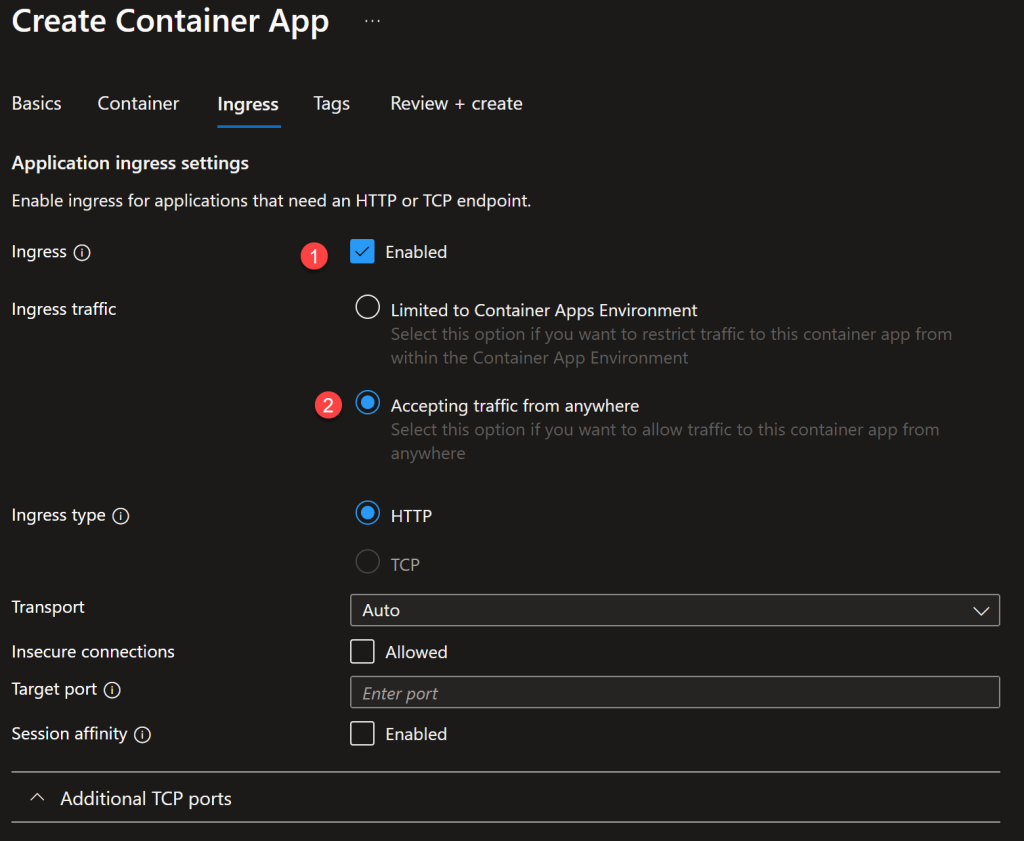
Click the Next: Ingress > button. On the next page check the box to enable network ingress and allow the ACA instance to receive HTTP traffic. (1) Under Ingress traffic, select Accepting traffic from anywhere. (2) Accept the defaults for the remaining values.
Click the blue Review + create button followed by the Create button to deploy the container.
When the provisioning finishes, go to the page for the ACA resource. On the Overview, copy the Application Url.

Paste the URL into a new browser tab and append /docs to the end. You’ll see the interactive documentation but it’s running on Azure! And the data is coming from the same PostgreSQL Flexible server you created earlier in the post. Try out a few endpoints, and then query the database to see it working.
Summary
In this post, you saw how to deploy a database driven FastAPI application to Microsoft Azure. You used Azure Database for PostgreSQL Flexible servers to provision a PostgreSQL database to store the todo list data and queried it inside of Visual Studio Code. Then you connected the local FastAPI application to the database. You used Docker to build a container image for the application, ran a container locally, and monitored it using the Docker extension for Visual Studio Code. You pushed the container image to Azure Container Repository. And you saw how to deploy a container to Azure Container Apps and access the interactive documentation in the browser.
